How to access a Course bought on Selar
Introduction:
Congratulations on your course purchase through Selar! To ensure a smooth access process, we've outlined the steps for you to follow. Whether you're accessing the course for yourself or sharing it with someone else, this guide will help you navigate through the process effortlessly.

Before diving into the steps, it's important to note that the individual who clicks on the "Access Course" button first will be automatically linked to the purchase. If you're purchasing the course on behalf of someone else, it's recommended to share the receipt link with them instead of accessing it yourself.
Guide to Accessing Your Course Purchase:
- Create an Account or Log In:
To begin, visit www.selar.co and click on the "Start Selling" button. This will either lead you to create a new account or log in to your existing Selar account.
- Switch to "Customer Profile":
After successfully logging in, switch your account mode to the "Customer Profile." This can be found within your profile options.

- Access My Purchases Tab:
Once you're in the customer profile, navigate to the dashboard. Look for the "My Purchases" tab and select it.
- Locate Your Course:
In the "My Purchases" section, you'll find a list of products associated with your email address. Your purchased course will be among the listed items.
Once you're in the customer profile, navigate to the dashboard. Look for the "My Purchases" tab and select it.
- Locate Your Course:
In the "My Purchases" section, you'll find a list of products associated with your email address. Your purchased course will be among the listed items.

- View Receipt and Access:
Identify the purchased course and click on the "View Receipt" option. This will take you to a receipt page with relevant details. On this page, you'll find a button that allows you to access the course. Click on this button.
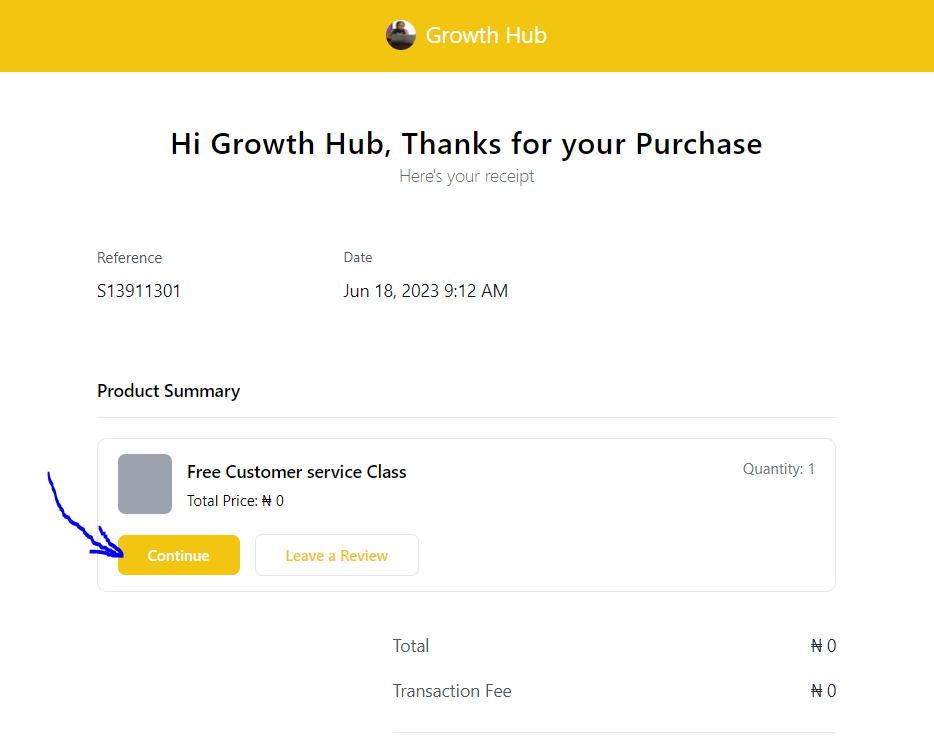
Identify the purchased course and click on the "View Receipt" option. This will take you to a receipt page with relevant details. On this page, you'll find a button that allows you to access the course. Click on this button.
- Enjoy Your Course:
Upon clicking the access button, your course will open on the browser.
Optimal Browsing Experience:
For the best browsing experience while taking your course, we recommend using Google Chrome as your browser.
Additional Resources:
If you'd like a visual walkthrough, we've provided a video guide on how to access your Selar course or ebook purchase. This video can provide further clarity and assistance throughout the process.
Conclusion:
With this comprehensive guide, you're now equipped to effortlessly access your purchased course on Selar. Whether you're accessing it for yourself or sharing the experience with someone else, following these steps will ensure a seamless journey into your course content. Happy learning!
With this comprehensive guide, you're now equipped to effortlessly access your purchased course on Selar. Whether you're accessing it for yourself or sharing the experience with someone else, following these steps will ensure a seamless journey into your course content. Happy learning!
Related Articles
Course Certificate on Selar
Hi, Now merchants can set the option to issue certificates on course completion. The option for course certificates is on the edit product page of a course, under the options dropdown. You can check the box to issue the certificates, and you can ...How to manually give access to your course on Selar
If you have a customer who made a payment outside of Selar and you wish to grant them access to their purchase on the Selar platform, follow these two simple steps: Step 1: Grant Access via Email Create a 100% discount coupon: Generate a coupon that ...How can an affiliate access Selar's affiliate network
Follow these steps to become an affiliate and start earning commissions: Step 1: Login or Register First, you need to have a Selar account. If you already have one, simply log in. If not, you’ll need to create one. 1. Login to Your Selar Account: - ...How to hide the course curriculum on the product page of a course product
To hide your course curriculum from previewing on the course product page, kindly follow the step below. 1. Visit your selar dashboard and navigate to "All Product" or click on https://selar.co/me/products 2. Select the course product you want to ...How does Selar Work?
Selar: Your Platform for Selling a Variety of Products and Services Selar provides a comprehensive platform where you can sell a wide range of products and services to customers around the world. Whether you have digital products, physical items, ...